Package contents:
- (1) XL650/750 Spent Primer Chute
- (2) Hex cap screws #8-32 (9/32 hex key)
Installation:
- Use a hair dryer to heat the end of your tubing for about 45 seconds. It should be pliable but not too hot to touch. Do not use a hair dryer to heat up the plastic chute, only the tubing.
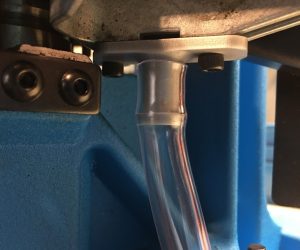
- Insert the tube onto the barb of the primer chute until it approaches the flared portion. All assembly to cool until room temperature. The tubing will shrink slightly as it cools preventing it from slipping off (no cable clamps/zip ties are required)
- Remove the existing spent primer cup and the spent primer cup bracket from your reloading press
- Install the XL650/XL750 Primer Chute Kit using the included hex cap screws. Ensure the screws are tight but not over-torqued. Warranty claims due to over-torqued screws will be denied.
- Route the PVC tube and use nylon cable ties to secure it to your bench, wall, or other structure to ensure it stays in place. Prior to securing it, ensure that the route of the tube will not be crushed by the camming action of the press when the handle is operated.
- Insert the hose into your bucket/can or utilize the included soda bottle cap. The cap is designed to fit on any standard 20oz soda bottle (Coke/Pepsi/etc).
- Over time, the PVC tube may become dirty and difficult to see through, remove the chute from your press and use a 22cal cleaning rod with a patch to swap it out. DO NOT use any chemicals on the patch otherwise the solvent may destroy the adapter.